eXtremeSQL Support for DBeaver
To use DBeaver as a GUI front-end to eXtremeDB databases, the only necessary component of the eXtremeSQL package is its JDBC driver. In summary, the steps to install and use DBeaver are:
1. Download and install the proper version of the DBeaver DB manager
2. Use xSQL as eXtremeSQL server or integrate the eXtremeSQL Remote SQL server into the application
3. Register the JDBC driver in DBeaver (see instructions below)
4. See usage instructions for helpful information
5. Other useful materials include official documentation, an article on writing templates and instructions on data export / import procedures for DBeaver (further discussed below)
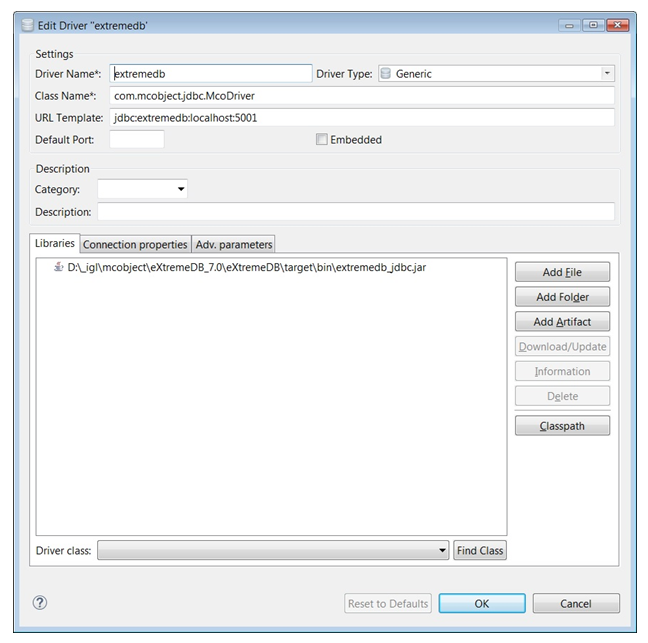
Registering the eXtremeSQL JDBC driver in DBeaver
Start DBeaver and open a dialog from menu Database -> Driver Manager and press button New. A dialog like the Edit Driver image below will appear. Fill in the Driver Name field. Then press button Add File and choose the eXtremeSQL JDBC driver. It is usually placed in the
target/bindirectory with a path likeeXtremeDB\target\bin\extremedb_jdbc.jar'.The next step is to press button Find Class and select from the drop down list Driver class (the only available class). This class name will be automatically put to field Class Name of the Edit Driver dialog.
Then fill in the field URL Template with a string like the following
jdbc:extremedb:localhost:5001wherejdbc:extremedbis the identifier of the eXtremeSQL JDBC driver,localhostand5001are the address and port of eXtremeSQL server (xSQL).Finally go to the tab labeled Adv. parameters. Here enable parameter Driver supports indexes and disable parameter Driver supports references. Now press OK to save the newly created driver.
Creating a DBeaver DB connection based on the eXtremeSQL JDBC driver
Select the DBeaver menu File -> New and choose DBeaver -> Database Connection in the wizard selection dialog. Then press button Next and select the
extremedbdriver from the list of connection types. Then press Next again.In the Generic JDBC Connection Settings dialog press button Edit Driver Settings and then press OK on the dialog that pops up. This operation automatically fills the field JDBC URL as it was previously defined in field URL Template of the driver settings dialog. Leave the User name and Password fields empty and proceed through the Next dialogs and finally Finish.